It’s fairly simple and quick to move apps to the SD card of your Android device, so read on!

We can remember a time when we couldn’t have imagined filling 16GB of internal storage on a mobile device, let alone 32GB! However, many of us now use our portable devices for photography and video capture, apps, emails, personal finance, listening to music, watching videos, and so much more. More importantly, modern games are quite graphics-heavy and consume a lot of space. It’s fairly easy to run of storage on your devices. So, when a user tries to install a new app and Not Enough Space warning pops up it becomes frustrating to decide which content to delete or which app to remove from internal memory get the required storage. If the device has a memory card slot then its a great relief as you simply move apps to an SD card to free up space.
Android apps are automatically installed to the internal storage of your phone by default, but you can move those currently installed apps (or portions of them) to the SD card, enabling you to maximize the storage on your device. Depending on the version of Android your device is running, you can also set the default location to be the SD card, to stop the internal storage becoming too cluttered. Depending on the amount of extra storage you want, such cards are fairly inexpensive for the convenience they offer, and it’s pretty simple and quick to move apps to the SD card.
There are different ways of doing this and we’ll run through them here, although it should be noted first that the best apps to move to an SD card are those that aren’t too demanding. This is because running them from an SD card is likely to be less speedy as running them from the internal storage. The method you choose involves a number of different aspects, such as the type of apps you’re moving, the device you’re using, and the version of Android your device is running.
Something worth mentioning from the start is that in the case of some pre-installed apps such as YouTube or Google Chrome, you’ll find the option to move them to an SD card is unavailable. Also, some particular phones move just a portion of an app to the SD card while the rest remains in the internal storage, thus freeing up less space, while some developers don’t allow the moving of their apps to an SD card at all. The steps below may differ very slightly depending on the type of phone and whether it’s running stock Android or a manufacturer’s skin, but generally, the process will be very similar, so let’s check out the options.
Option 1 – Move apps to the microSD card using Android application management system
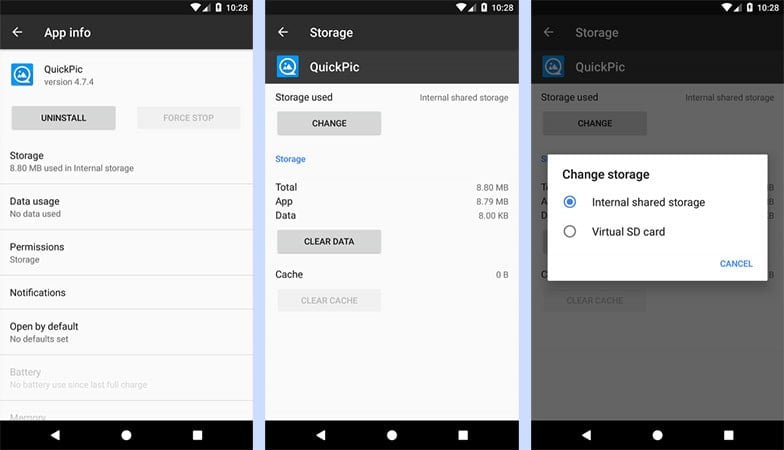
This method might be a little different based on your current Android version. However, the basic route is to head from the app drawer on your device to the Settings menu. Tap on Application Manager to get a list of the apps you have installed, and then select the app you wish to move to the SD card. The next step is to tap Storage and if you see the Change option you’ll know you can move the app. If this does not appear, this means you cannot transfer that app. From Change, you’ll see options for Internal Storage or Transcend SD card. Tap on the latter to move the app to the SD card, or if you want to move an app back to internal storage simply choose this option. That was pretty easy right, but there are other methods available if your device doesn’t support this way. For your convenience, we put it in a step by step process. Just remember it may be slightly different on your device.

- Go to Settings > Apps & notifications > App info.
- Scroll down to find the app you want to move to the card and tap on it.
- Select Storage. If the app supports being moved to a card, you’ll see a section labeled Storage used. Hit the button marked Change.
- Select the memory card you want to move the app to, followed by Move.
- Similarly, you can also move back an app to the internal memory of the device.
Option 2 – Use an SD Card as internal storage on devices running Android 6.0 Marshmallow and higher.
If your smartphone is running Android Marshmallow or higher you can format a microSD card to act as an integral part of the internal storage (dependent upon device). This is dubbed Flex or Adoptable Storage, and while major players such as LG and Samsung have removed this feature, others such as HTC and Motorola do support it. However, when formatting the microSD card as internal storage you won’t be able to use the card in another device unless it’s reformatted, and current data on the card back up erased. That’s something to bear in mind and you may want to back up the current data on the card to your PC or transfer apps on the SD card back to internal storage before you begin.
Another pointer if you want to do this, is that you should opt for one of the fastest microSD cards to get optimum results. To use this feature, follow the step by step guide below.
- First head to the Settings menu then tap on Storage.
- At the very top corner on the right of the screen you’ll see the button for the overflow menu (three vertical dots) and from there select Storage Settings.
- Tap on Format as Internal Storage followed by Erase and Format.
- At this point, some people using an SD card that’s too slow may see a message of caution that it could negatively affect the performance of the device. For instance, it could lead to slow data transfers or apps stuttering, and therefore we’d recommend using at least a Class 10 or UHS card.
- If you decide to proceed, tap on Move Now followed by Next to start the transfer, and finally tap Done.
- Remember not to remove the SD Card during the formatting process.
- At this point, the system will then recognize your SD Card as if it was an integral part of the internal storage, and when you head to the Storage section under Settings you’ll see the adopted card and internal storage listed together.
Once you’ve done this, every time you install an app on your device, Android will decide where it’s placed depending on the recommendations of the developer. It’s not recommended to then move the apps again, but if you choose to do this you’ll need to head to Settings, followed by Storage and USB. From the Internal or SD card options, tap Apps, choose the app you want to be moved and then tap Change.
Option 3 – Move Apps to an SD Card Using Third party App
Unfortunately, if your device doesn’t support any of the methods explained above there is still hope to move apps to external memory by using an app. However, the downside is you need to root your device to allow the app to do its magic. If your device is already rooted then it just matters installing an app like Link2SD, App2SD Pro, or FolderMount.
Link2SD and App2SD are the most popular options which also has in-app purchase for extra premium features.
It’s true that growing numbers are now opting to use the Cloud to negate concerns about running out of storage, but using an SD card is still a popular option. By moving apps to an SD card you’ll avoid those unfortunate occasions when the memory is so full that you can’t download even one more app. When this happens we have found ourselves, deleting a whole bunch of apps, videos, and more, and so learning how to install and move apps to SD card on Android really makes sense.
At first glance, it might look like it’s not worth the effort to move apps to an SD card or use the SD card as adopted internal storage. The information can look rather daunting if you’ve never attempted this before, but it really isn’t too difficult if you follow the above steps as you go. If you want to maximize the storage of your device and follow one of these methods, do let us know how you got on in the comments section.
