Guide on how to change MAC or Media Access Control address on Android devices

What is MAC Address or WiFi MAC Address?
MAC address or the Media Access Control Address is a unique address assigned to the Network Interface of a device. It is a 12-character unique ID assigned to the Network Interface Card of any Wi-Fi device. With a MAC address, one’s Android phone can be uniquely be identified on a local network or over the internet.
Why you should change MAC address?
Usually, a MAC address is the permeant identity number of a device. But there are many reasons to change the device’s MAC address.
- The most important reason is the requirement of more privacy or safeguarding oneself when using a public Wi-Fi, or breaching Firewalls set by the ISP.
- Another reason to change mac address being able to join a Wi-Fi that has blocked your device.
- moreover, if someone knows your original MAC address he can use it to access your network when you are offline by pretending to be the same as your device.
Whatever may be the reason, by the end of the article, you will able to change the MAC address of any Android Device.
How to Find MAC Address on Android Devices
To locate the MAC address on an Android device, you need to follow the following steps.
For devices running on the Android version 8 or above you can quickly find the mac address by simply going to Setting > Scroll Down and tap on About Phone > Tap on Status. Once again, scroll down, and you will be able to see the Wi-Fi MAC Address. Note it down as per requirement.

In case you have a device with an older version of OS or if you are not able to locate the MAC address with the above technique, use the following method.
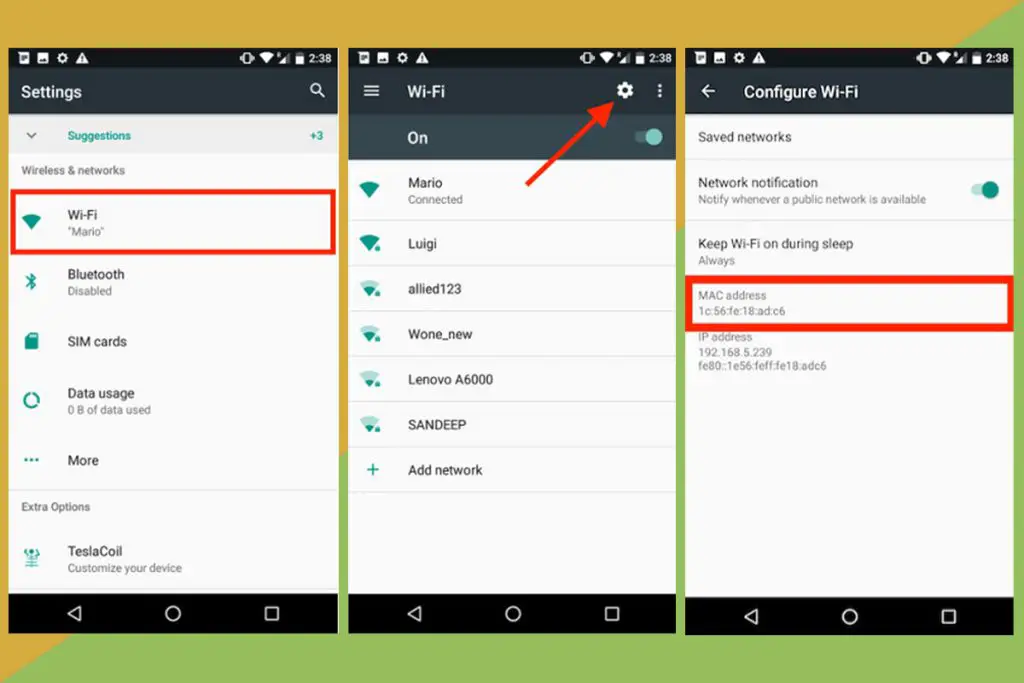
Open Settings, go to Wi-Fi then tap on the setting icon at the top-right corner. This will open up the Configure Wi-Fi section. At the bottom of the screen, the MAC address of the Phone’s Wi-Fi Network card will be prompted without being highlighted. Note it down for the upcoming procedures.
How to Change the MAC Address on Android?
There are two different ways to change the MAC address, both come with their perks and limitation and are suited for different purposes. To change the MAC address on your Android device, you need to see whether your device has root access. This is because the procedure of changing the MAC address on a non-rooted device is quite different from a rooted device.
How to Check Root Access on Android
In case if you haven’t rooted your phone, then you can skip this step. For those who have rooted, well, it is always good to be sure before heading ahead. So as a precautionary measure, try to verify your device with the help of Root Checker.

- Download Root Checker from the Google Play Store and open it.
- Open the app and tap on “Verify Root”.
- Wait for a moment and the app will show whether your phone is properly rooted or not.
- Once you are able to check and verify the root status you can move on with further procedures.
How to Change MAC address on Non-Rooted Devices
For anyone who does have root access on their Android device, this set of instructions is for you. With the simple procedure, anyone can temporarily change the MAC address of their Android Smartphones without the requirement of root access.

- First of all, Get the MAC Address of the Android device. This can be done by following the procedures mentioned above.
- Note down the MAC address of the device and then download Android Terminal Emulator from Google Play Store.
- Open the app and then type the command: ‘ip link’.
- The screen will be filled up with a lot of information along with the MAC address. Recall the MAC address which had been noted and search it under “link/ether” for every case.
- Usually, the link which matches the MAC address is the connection name. For. Most Android Devices this is either “eth0” or “wlan0”.
- Now type the following command: ip link set wlan0 address XX:XX:XX:YY:YY:YY, where wlan0 is the name of the interface and XX:XX:XX:YY:YY:YY is the custom MAC address as required by the user.
- That’s it. The MAC address will be temporarily changed. However, once the device restarts the MAC address will automatically revert back to the original one.
Important Note: During the whole process, it is necessary to keep the manufacturer’s name unchanged, which means while changing the MAC address, which is XX:XX:XX the first six digits should not change, it must be the same as the original. Else this might create a lot of authentication issues. Also, this method mostly works on devices with MediaTek processors. So devices with processors from other brands have a low chance of success and may require to root their device.
How to Change MAC address on Rooted Devices
As mentioned earlier, after root access is verified on the Android Device, users can move on to change the MAC address on their Android. However, there are two ways to change the MAC address on a rooted phone, these are either through
- ChameleMAC or,
- Terminal through BusyBox
ChameleMAC: This app is not available on Google Play Store. You can download it through a 3rd party app or search over the internet and download the APK to install it.

- Launch the app and Grant Root Permission when prompted.
- Upon Launching the app, two options will be revealed one being Generate Random MAC and the other Apply new MAC.
- The user can type a new MAC address in the text field and press Apply new MAC.
- The user may also tap on generate Random MAC to avail a random MAC address
- A confirmation box will pop up, press Change and the MAC address of the device will change accordingly.
Note: This app only works on devices with a MediaTek processor.
Terminal through BusyBox: The MAC address changed through this method is permanent and does not change even after the device restarts. This method requires both the Terminal Window and Busybox on the rooted device.

- Launch the terminal Window App and type the command “su”. This access the superuser mode.
- We assume that you have the network setting noted down, if not you may type “busybox ip link show eth0”. This will showcase the current MAC address on the device.
- Type “busybox ipconfig wlan0 hw ether XX:XX:XX:YY:YY:YY” . Remember, the input for XX:XX:XX:YY:YY:YY will change the MAC address as desired.
- That’s it. You have successfully altered your MAC address on your Android Device. Also, the command “busybox ip link show eth0” will only show the new altered MAC address.
After following the above steps, one can quickly manipulate and change the Mac Address of any Android Device and avail all the benefits and security from it.
Each technique has its advantages, duration, and limitations. Just select the one which is more comfortable for you. Although one must remember that changing such vital information comes with risk so you should be willing to take full responsibility for your android device.