Six different ways to take screenshots on Galaxy S phones
Why you might need to take a screenshot on your Galaxy S smartphone? There are several reasons you may want to do this. For instance, with a screenshot, you can share website information with others, save and show booking or ordering information, how you’re doing in a favorite game, or something that amused you on social media. Another handy reason for screenshot is if you need to show what happens in some cases to technical support.
Smartphones in Samsung’s Galaxy S series have always been hugely popular, with the latest being the Samsung Galaxy S20 models, which released just a few months ago. There are different methods to take a screenshot on Galaxy phones without the need for apps, and the lack of a physical home button on the new Galaxy devices changes the procedure slightly with the first method. It’s really quick and simple to do though, and we’re about to run through some of the various methods available for both the newest and older models.
Please note some methods to capture a screenshot may be slightly different depending on the Galaxy S model being used but the majority of the instructions will still apply.
How to screenshot on Galaxy S phones?
Capture screenshot using the button shortcut
This method actually works for plenty of other Android devices, as well as those in the Galaxy S lineup. When your phone is displaying the content follow the steps below.
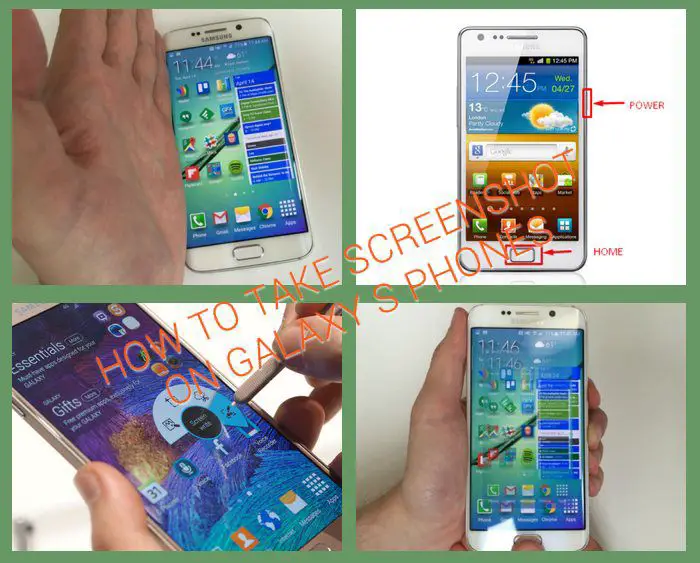
How to take a screenshot on Original Galaxy S, S2, S2, S4, S5, S6, S7 series phones and Galaxy Note
- Hold the Power key and Home button simultaneously.
- The screen will flash, indicating that a screenshot was captured.
The latest flagship devices in Galaxy S lineup no longer has a home button. In this instance follow the steps below
How to take a screenshot on newer Galaxy S8, S8, S9, S10, S plus models, S20, and S20 Ultra phones
- Press and hold the Power button and Volume down keys simultaneously.
- The screen will flash, indicating that a screenshot was captured.
In either case, the trick here is to make sure you press the said buttons at the same time to avoid triggering either functionality. If taking the screenshot is successful, the camera shutter sound will activate (as long as you haven’t turned the notification sound off), accompanied by an on-screen animation. The next step is to head to the Gallery, Photos app or Google Photos if you use it, or Samsung’s proprietary My Files file browser to see the screenshot. If using Android File Transfer or to locate the screenshots from a command line, you’ll come across them under pictures/screenshots.
Palm swipe to take a screenshot
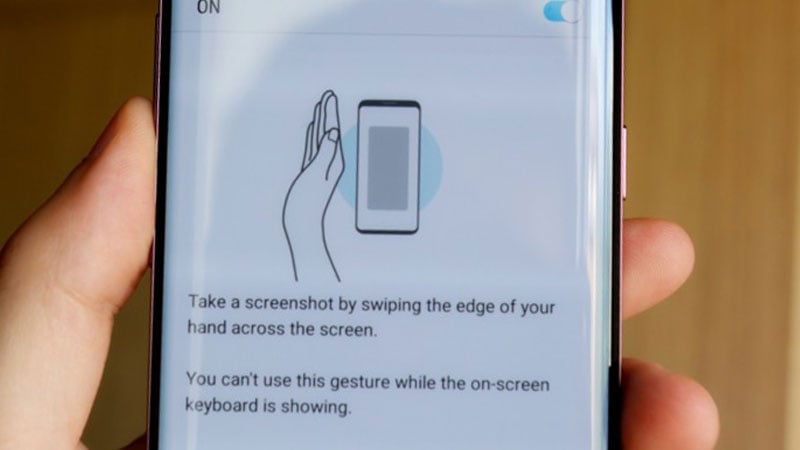
This is Samsung’s alternative method to take screenshots from its phones. All you need to do is swipe the palm of your hand from one side of the display to the other. A handy tip here is to tilt your thumb away from the display, and just the same as with the first option, the short animation and shutter sound will let you know the screenshot has been taken.
Something worth noting with this option is that some people find it too easy to take a screenshot without realizing, and because of this the default method can be disabled in Settings if you wish. To do this, tap Motion> Motions and gestures, and then turn the toggle button off for Palm swipe to capture. Now navigate to the app you want to capture and swipe the palm of your hand from the edge of the display on the left or right side.
Use the Assistant Menu to take a screenshot
The Samsung Galaxy S6 and later smartphones have benefitted from the Assistant Menu, and this offers yet another way of taking a screenshot. This is an accessibility tool that’s designed to be used for those that require a little help with dexterity, but of course, it can be used by anyone if desired.
However, it’s not enabled by default, so you’ll first need to enable it by heading to Settings followed by Accessibility, Dexterity, and Interaction, and then Assistant Menu. The options then displayed on the right will be grayed out, and you’ll need to toggle or tap on the switch at the top right corner to turn on the menu. After this, a floating button will show on the home screen, and when you tap on this, it will expand. When navigating through the Assistant Menu using the arrow you’ll come across a Screenshots option, and you simply tap on this to take a screenshot. It’s worth knowing that if the Screenshot button is several pages into the menu, you can reposition it to the first page to speed things up a little.
Use your voice to take a screenshot
Samsung’s own virtual assistant called Bixby Voice allows to take a screenshot with a simple voice command. Say “Hey Bixby, take a screenshot,” and a screenshot will be taken with what’s on your screen. Interestingly Bixby is also capable of handling complex commands such as taking a screenshot and sharing directly through third-party apps such as Facebook and Twitter. The same functionality is also available through Google Assistant as well. Say “OK Google,” use the shortcut button to launch Assistant. Then just say, “Take a screenshot,” it’s that easy.
Capture a scrolling screenshot
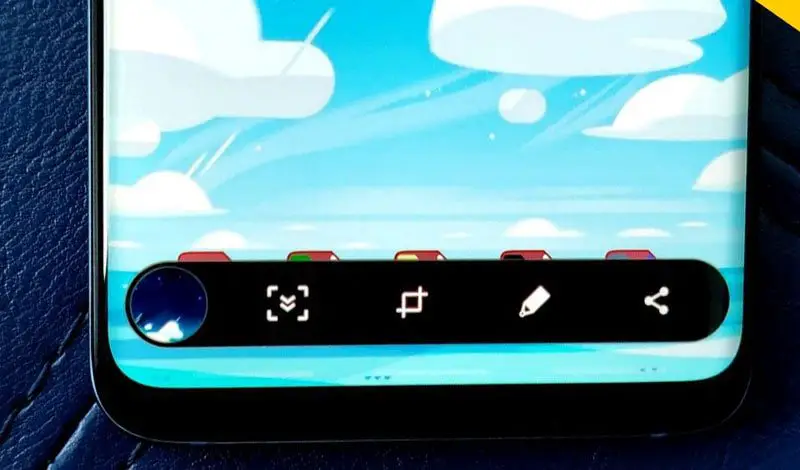
The Android Marshmallow update brought along the scrolling capture (smart capture) feature, and you can take advantage of this on phones such as the Galaxy S6 and later. This means that instead of taking numerous screenshots, you can scroll capture one long screenshot with a tall scrolling screenshot instead. This is really useful for capturing a web page for example. Note that the smart capture icon automatically appears taking a screenshot on a large web page, app screen, or image that requires scrolling.
- Navigate to the screen you want to capture.
- Press the Power and Volume down keys simultaneously and the Smart capture menu will appear
- Tap the Scroll capture button – an arrow will show as the scroll capture process. Keep tapping the icon until you get the content you want.
- The smart capture menu also allows you to add tags to your screenshots by tapping the hashtag icon.
Where are screenshots saved on a Samsung Galaxy S?
No matter what phone you used, the screenshots are automatically saved in the Gallery. On some phones, the images are organized in an Albums called Screenshots so you could easily find them.
How to Edit, Share and Save screenshots on Galaxy S phone?
Once the required screenshot is captured, you might want to edit the images to cut out some information or add annotations. Every time you take a screenshot a small preview will popup immediately. Just tap on it and then you will multiple options to edit the images, share it, or delete.
A final thing to note is that screenshots saved on your smartphone will take up space in the usual way or take up cloud storage. Therefore, if you want to free up storage, it’s worth spring-cleaning your photo gallery occasionally to remove any dead wood.
By following the methods in our look at how to take a screenshot on Samsung Galaxy S phones, you’ll soon find it second nature to capture screenshots without even having to think about it. So next time you’re having a problem with an app, and you need to supply a screenshot to the developer, no problem! Similarly, you might want to quickly send a screenshot of a particularly funny image on social media that you know a friend would like to see.
Whatever the reason for taking a screenshot, we’d be interested to hear which of the above methods you mostly use? Perhaps you are going to use a different way of taking a screenshot that we have not mentioned in this guide? Why not drop us a comment to let us know.
